Necesitamos comenzar a definir algunos obstáculos en el camino de nuestro personaje; utilizaremos algunas cajas para ayudar a crear también los mapas de los niveles.

De forma similar a como lo realizamos con Fruit, creamos una clase llamada Box:
package gsampallo;

import java.awt.Point;
import java.awt.image.BufferedImage;
import java.io.File;

import javax.imageio.ImageIO;

public class Box implements Element {

    public static int BOX1 = 0;
    public static int BOX2 = 1;
    public static int BOX3 = 2;

    public int width = 28;
    public int height = 24;

    private int boxNumber;
    private Point position;

    private boolean isBreak = false;

    public Box(int boxNumber,Point initialPosition) {
        this.boxNumber = boxNumber;
        this.position = initialPosition;

        loadImages();
    }

    private BufferedImage imageBoxIdle;
    private BufferedImage imageBoxBreak;

    private void loadImages() {

        String[] imagesPath = {
            "image/Items/Boxes/Box1/",
            "image/Items/Boxes/Box2/",
            "image/Items/Boxes/Box3/"
        };

        String pathIdle = imagesPath[this.boxNumber]+"Idle.png";
        String pathBreak = imagesPath[this.boxNumber]+"Break.png";

        try {

            imageBoxIdle = ImageIO.read(new File(pathIdle));
            imageBoxBreak = ImageIO.read(new File(pathBreak));

        } catch (Exception e) {
            System.err.println("No se pudieron cargar imagenes de Box");
            System.err.println(e.getMessage());
        }
    }
Las cajas trabajan de manera similar a Fruit, la diferencia es que no son recolectadas y presentan un obstáculo para nuestro jugador. Si, en cambio, pueden ser destruidas, pero sobre esto más adelante.
Queda por implementar updateBox(), para que actualice los parámetros de la caja y getImageBox() para obtener la imagen que se utilizara para dibujar:
    private int numberImageBreak = 0;
    public void updateBox(boolean move) {
        if(isBreak) {
            if(numberImageBreak <= (imageBoxBreak.getWidth()/width)) {
                numberImageBreak++;
            } else {
                visible = false;
            }

        }

        if(move) {
            position.x--;
            visible = (position.x > 0);
        }
    }

    public BufferedImage getBoxImage() {
        if(isBreak) {
            int x = numberImageBreak*width;
            return imageBoxBreak.getSubimage(x, 0, width,height);
        } else {
            return imageBoxIdle;
        }
    }
Como Box implementa la interface Element, debemos definir los metodos indicados en la misma, aprovechamos y definimos los necesarios para poder establecer que la caja se rompio y que es visible.
    private boolean visible = true;

    public boolean isVisible() {
        return visible;
    }

    public int getX() {
        return this.position.x;
    }

    public int getY() {
        return this.position.y;
    }

    public int getWidth() {
        return this.width;
    }

    public int getHeight() {
        return this.height;
    }

    public boolean isBreak() {
        return isBreak;
    }

    public void setBreak() {
        isBreak = true;
    }
También debemos crear una lista en RunnerOne para almacenar las cajas, de la misma manera que lo hicimos con Fruit; entonces agregamos las siguientes lineas en el constructor de RunnerOne:
private ArrayList<Box> listBox;
public RunnerOne() {
/** resto del codigo **/
Box box = new Box(Box.BOX1,new Point(180,410));
Box box1 = new Box(Box.BOX2,new Point(210,410));
Box box2 = new Box(Box.BOX3,new Point(240,420));
listBox = new ArrayList<Box>();
listBox.add(box);
listBox.add(box1);
listBox.add(box2);
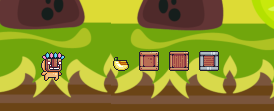
}Mostramos tres cajas, una de cada tipo.
Tendremos que modificar updateGame() para que actualice la lista de cajas:
public void updateGame() {

  /** resto del codigo **/

  if(!listBox.isEmpty()) {
    Iterator it = listBox.iterator();
    while(it.hasNext()) {
      Box box = (Box)it.next();

      box.updateBox(moved);
      if(!box.isVisible()) {
        it.remove();
      }
    }
  }

}
Recordemos que la variable moved la definimos antes de evaluar el bloque de código correspondiente a la lista de Fruit.
También debemos actualizar el método paint():
public void paint(Graphics g) {
  if(!listBox.isEmpty()) {
    Iterator it = listBox.iterator();
    while(it.hasNext()) {
      Box box = (Box)it.next();
      if(box.isVisible())  {
        g.drawImage(box.getBoxImage(),box.getX(),box.getY(),null);
      }
    }
  }
}
Cuando compilemos y ejecutemos nos va a mostrar el personaje junto con las tres cajas, una de cada tipo:
En el siguiente articulo veremos como destruir las cajas.