ESP32-CAM es un excelente dispositivo para utilizarlo para generar timelapse, tanto por su tamaño como por su precio.
Uno de los temas que se debe resolver al trabajar con los timelapse, es el almacenamiento de las fotografías que obtenemos. Si bien el ESP32-CAM tiene la posibilidad de almacenar las fotografías en una tarjeta de memoria, la conveniencia de que las suba automáticamente a un servidor FTP simplifica mucho la tarea.
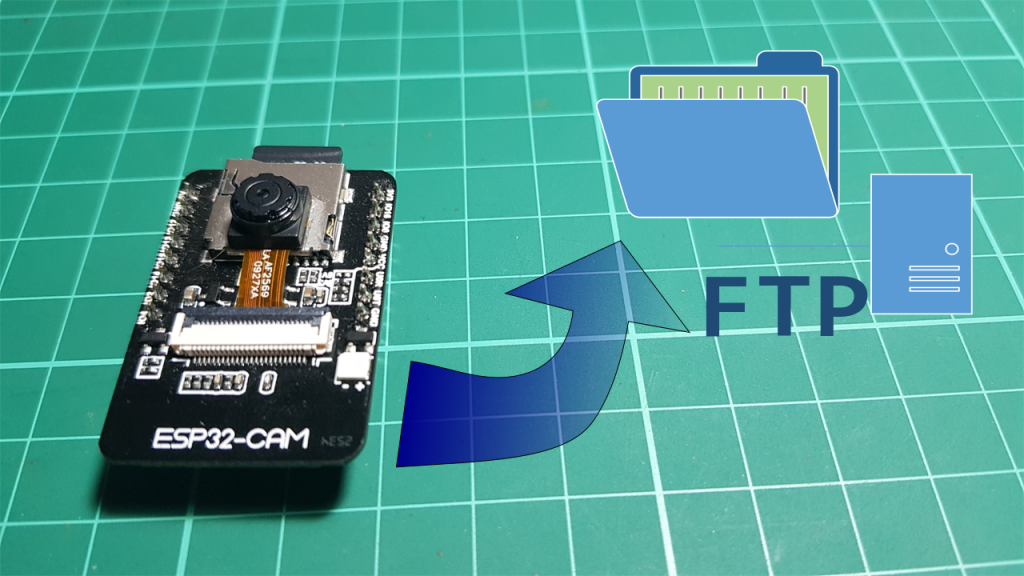
En este articulo vemos como realizar esta tarea de manera extremadamente simple, gracias a la librería ESP32_FTPClient
La misma permite varias operaciones con el servidor FTP, entre las que se encuentra cambiar de carpeta, listar el contenido, subir y descargar archivos. Nos enfocaremos en subir un archivo, que sera la fotografía que hayamos obtenido.
Comenzaremos descargando e instalando la librería mencionada en el IDE de Arduino. Para ello una vez que se haya descargado el archivo, vamos al menú Programa – Incluir Liberia – Añadir Liberia .ZIP y seleccionamos el archivo que descargamos.
A continuación, se detalle como funciona:
#include "esp_camera.h"
#include "soc/soc.h"           // Disable brownour problems
#include "soc/rtc_cntl_reg.h"  // Disable brownour problems
#include "driver/rtc_io.h"
#include <WiFi.h>
#include <WiFiClient.h>
#include "ESP32_FTPClient.h"

#include <NTPClient.h> //For request date and time
#include <WiFiUdp.h>
#include "time.h"

char* ftp_server = "SERVER";
char* ftp_user = "USER";
char* ftp_pass = "PASSWORD";
char* ftp_path = "/USER/;

const char* WIFI_SSID = "NETWORK";
const char* WIFI_PASS = "PASSWORD";

WiFiUDP ntpUDP;
NTPClient timeClient(ntpUDP, "pool.ntp.org", (-3600*3), 60000);

ESP32_FTPClient ftp (ftp_server,ftp_user,ftp_pass, 5000, 2);
Ademas de importar las librerías dedicadas a la cámara y a operación de las redes wifi, también necesitamos importar la nueva librería para trabajar con FTP.
NTPClient nos permite consultar la fecha y la hora, uno de los parámetros que le pasamos es la diferencia horaria, expresado en segundos; en mi caso son -3 horas por lo que se pasa como parámetro (-3600*3).
Incorpore dos funciones a la libreria NTPClient para que sea mas sencilla de tomar los datos de fecha/hora y poder utilizarlos en este caso, pueden descargar aquí.
Luego instanciamos las variables que contendrán los datos del servidor ftp, así como usuario/clave y la ruta donde subiremos el archivo.
// Pin definition for CAMERA_MODEL_AI_THINKER
#define PWDN_GPIO_NUM     32
#define RESET_GPIO_NUM    -1
#define XCLK_GPIO_NUM      0
#define SIOD_GPIO_NUM     26
#define SIOC_GPIO_NUM     27

#define Y9_GPIO_NUM       35
#define Y8_GPIO_NUM       34
#define Y7_GPIO_NUM       39
#define Y6_GPIO_NUM       36
#define Y5_GPIO_NUM       21
#define Y4_GPIO_NUM       19
#define Y3_GPIO_NUM       18
#define Y2_GPIO_NUM        5
#define VSYNC_GPIO_NUM    25
#define HREF_GPIO_NUM     23
#define PCLK_GPIO_NUM     22

camera_config_t config;
Se definen los GPIO que seran utilizados para la cámara y la variable config, que utilizaremos para configurar los parametros de la cámara.
void setup() {
  WRITE_PERI_REG(RTC_CNTL_BROWN_OUT_REG, 0); //disable brownout detector

  Serial.begin(115200);

  WiFi.begin(WIFI_SSID, WIFI_PASS);

  Serial.println("Connecting Wifi...");
  while (WiFi.status() != WL_CONNECTED) {
      delay(500);
      Serial.println("Connecting to WiFi..");

  }
  Serial.println("IP address: ");

  Serial.println(WiFi.localIP());

  initCamera();

  timeClient.begin();
  timeClient.update();

  ftp.OpenConnection();
}
En setup(), ademas de las clásicas rutinas se llama a initCamera(), que inicializara la cámara (se lo hace de esta manera para separar el código en bloques y que sea mas fácil la lectura); y luego se abre la conexión con el servidor FTP; esto podría hacerse en el momento de subir el archivo, pero se realiza en este punto para mejorar los tiempos entre cada imagen.
void initCamera() {
  config.ledc_channel = LEDC_CHANNEL_0;
  config.ledc_timer = LEDC_TIMER_0;
  config.pin_d0 = Y2_GPIO_NUM;
  config.pin_d1 = Y3_GPIO_NUM;
  config.pin_d2 = Y4_GPIO_NUM;
  config.pin_d3 = Y5_GPIO_NUM;
  config.pin_d4 = Y6_GPIO_NUM;
  config.pin_d5 = Y7_GPIO_NUM;
  config.pin_d6 = Y8_GPIO_NUM;
  config.pin_d7 = Y9_GPIO_NUM;
  config.pin_xclk = XCLK_GPIO_NUM;
  config.pin_pclk = PCLK_GPIO_NUM;
  config.pin_vsync = VSYNC_GPIO_NUM;
  config.pin_href = HREF_GPIO_NUM;
  config.pin_sscb_sda = SIOD_GPIO_NUM;
  config.pin_sscb_scl = SIOC_GPIO_NUM;
  config.pin_pwdn = PWDN_GPIO_NUM;
  config.pin_reset = RESET_GPIO_NUM;
  config.xclk_freq_hz = 20000000;
  config.pixel_format = PIXFORMAT_JPEG;

  if(psramFound()){
    config.frame_size = FRAMESIZE_UXGA;//FRAMESIZE_UXGA; // FRAMESIZE_ + QVGA|CIF|VGA|SVGA|XGA|SXGA|UXGA
    config.jpeg_quality = 10;
    config.fb_count = 2;
  } else {
    config.frame_size = FRAMESIZE_UXGA;
    config.jpeg_quality = 12;
    config.fb_count = 1;
  }
  // Init Camera
  esp_err_t err = esp_camera_init(&config);
  if (err != ESP_OK) {
    Serial.printf("Camera init failed with error 0x%x", err);
    return;
  }
}
En la función initCamera() inicializamos la cámara con los parámetros establecidos. Podemos cambiar la resolución de las imágenes reemplazando el valor de:
config.frame_size = FRAMESIZE_UXGA;
Por otro tamaño (QVGA|CIF|VGA|SVGA|XGA|SXGA|UXGA):
config.frame_size = FRAMESIZE_VGA; //para bajar la resolución de las imágenesvoid loop() {
timeClient.update();
takePhoto();
delay(60000);
}En la función loop() solo tenemos dos acciones, tomar la fotografía con takePhoto() y esperar por 60 segundos.
void takePhoto() {
camera_fb_t * fb = NULL;
// Take Picture with Camera
fb = esp_camera_fb_get();
if(!fb) {
Serial.println("Camera capture failed");
return;
}
/*
* Upload to ftp server
*/
ftp.ChangeWorkDir(ftp_path);
ftp.InitFile("Type I");
String nombreArchivo = timeClient.getFullFormattedTimeForFile()+".jpg";
Serial.println("Subiendo "+nombreArchivo);
int str_len = nombreArchivo.length() + 1;
char char_array[str_len];
nombreArchivo.toCharArray(char_array, str_len);
ftp.NewFile(char_array);
ftp.WriteData( fb->buf, fb->len );
ftp.CloseFile();
/*
* Free buffer
*/
esp_camera_fb_return(fb);
}
En la función takePhoto() se realizan tres operaciones: primero se toma una fotografía y se mantiene en el buffer fb.
En estas cinco lineas se realiza la subida al servidor ftp; primero cambiamos el directorio al directorio de trabajo, especificado en la variable ftp_path.
timeClient.getFullFormattedTimeForFile() nos devuelve un string con la fecha y hora en formato: AAAAMMDD_HHMMSS, concatenamos la extensión .jpg y lo convertimos a un array de char, que es el tipo de datos que toma la función NewFile de ftp.
Escribimos el buffer y cerramos el archivo.
La ultima tarea es liberar el buffer.
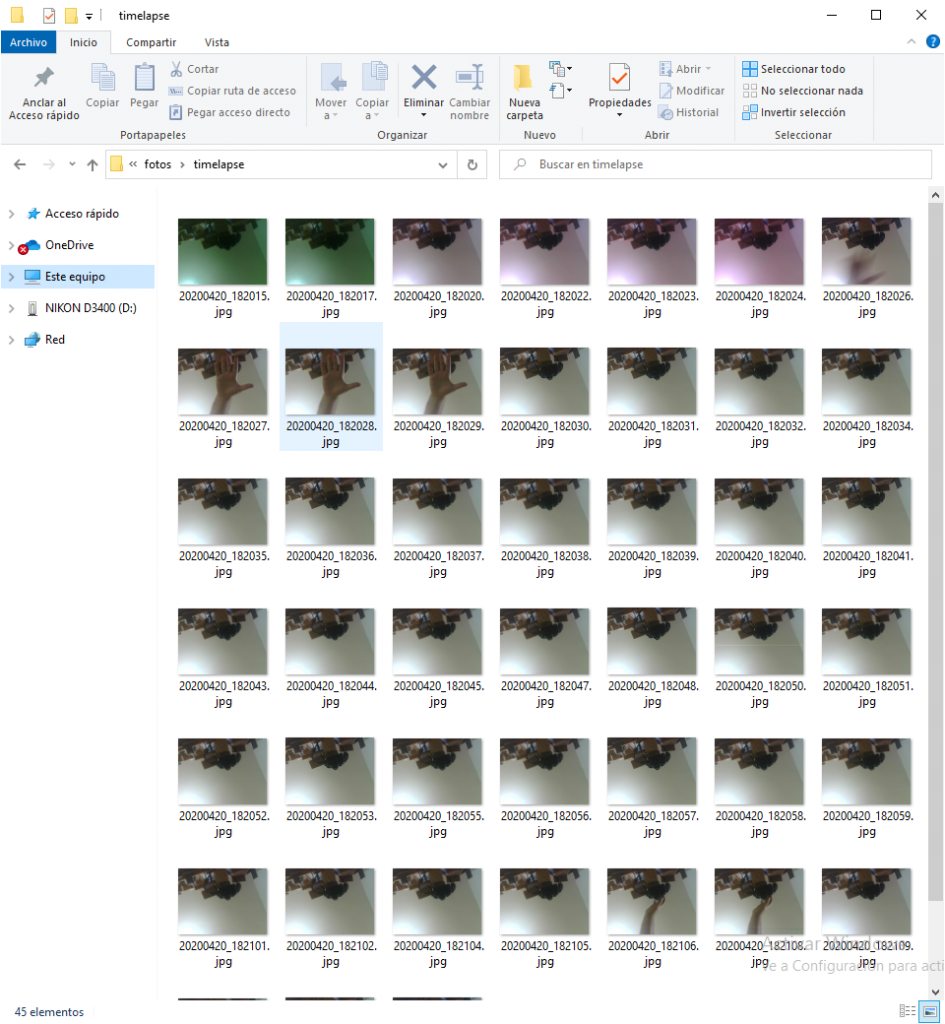
Una vez cargado el programa, las imágenes comienzan a subir de inmediato:
26 respuestas a «Subir fotos a un servidor FTP con ESP32-CAM»
La idea seria poder cojer la foto via serie, por ejemplo
Serial.?????????
en un raspberry poder cojer la foto por ejemplo en python, si no es posible otra pregunta cambiando este parametro
config.xclk_freq_hz = 20000000;
¿ se cambia el alcance ?
No entiendo tu pregunta.
El programa del post, toma la foto del Esp32-Cam y lo sube directamente a un servidor ftp, en mi caso es un servidor ftp local. Saludos
Yo no hablo español
Buen día
Me gusta mucho tu proyecto, me funciona muy bien, pero necesitaría convertirlo a internet móvil (módulo SIM800) después de transferir la imagen a FTP, así que veré bloques de los mismos datos, y eso es incorrecto, ¿dónde estoy? Estoy cometiendo un error? Gracias
#include «esp_camera.h»
// Pin definition for CAMERA_MODEL_AI_THINKER
#define PWDN_GPIO_NUM 32
#define RESET_GPIO_NUM -1
#define XCLK_GPIO_NUM 0
#define SIOD_GPIO_NUM 26
#define SIOC_GPIO_NUM 27
#define Y9_GPIO_NUM 35
#define Y8_GPIO_NUM 34
#define Y7_GPIO_NUM 39
#define Y6_GPIO_NUM 36
#define Y5_GPIO_NUM 21
#define Y4_GPIO_NUM 19
#define Y3_GPIO_NUM 18
#define Y2_GPIO_NUM 5
#define VSYNC_GPIO_NUM 25
#define HREF_GPIO_NUM 23
#define PCLK_GPIO_NUM 22
camera_config_t config;
void setup() {
Serial.begin(9600);
initCamera();
takePhoto();
ATInternet();
}
void loop() {
//takePhoto();
//delay(10000);
//}
}
void initCamera() {
config.ledc_channel = LEDC_CHANNEL_0;
config.ledc_timer = LEDC_TIMER_0;
config.pin_d0 = Y2_GPIO_NUM;
config.pin_d1 = Y3_GPIO_NUM;
config.pin_d2 = Y4_GPIO_NUM;
config.pin_d3 = Y5_GPIO_NUM;
config.pin_d4 = Y6_GPIO_NUM;
config.pin_d5 = Y7_GPIO_NUM;
config.pin_d6 = Y8_GPIO_NUM;
config.pin_d7 = Y9_GPIO_NUM;
config.pin_xclk = XCLK_GPIO_NUM;
config.pin_pclk = PCLK_GPIO_NUM;
config.pin_vsync = VSYNC_GPIO_NUM;
config.pin_href = HREF_GPIO_NUM;
config.pin_sscb_sda = SIOD_GPIO_NUM;
config.pin_sscb_scl = SIOC_GPIO_NUM;
config.pin_pwdn = PWDN_GPIO_NUM;
config.pin_reset = RESET_GPIO_NUM;
config.xclk_freq_hz = 20000000;
config.pixel_format = PIXFORMAT_JPEG;
if(psramFound()){
config.frame_size = FRAMESIZE_XGA;//FRAMESIZE_UXGA; // FRAMESIZE_ + QVGA|CIF|VGA|SVGA|XGA|SXGA|UXGA
config.jpeg_quality = 10;
config.fb_count = 2;
} else {
config.frame_size = FRAMESIZE_UXGA;
config.jpeg_quality = 12;
config.fb_count = 1;
}
// Init Camera
esp_err_t err = esp_camera_init(&config);
if (err != ESP_OK) {
Serial.printf(«Camera init failed with error 0x%x», err);
return;
}
}
void takePhoto() {
byte dat=0;
camera_fb_t * fb = NULL;
// Take Picture with Camera
fb = esp_camera_fb_get();
Serial.print(«Velikost obrazu: «);
Serial.print(fb->len);
Serial.print(» B,»);
Serial.print((fb->len)/1024);
Serial.println(» KB»);
Serial.print((fb->len) % 1024);
//Serial.print(«0x»);
/*for(int i=0;ilen;i++)
Serial.print(fb->buf[i], HEX);*/
Serial.println(«»);
// dat = HEX(fb->buf);
//Serial.write(fb->buf,fb->len);
if(!fb) {
Serial.println(«Camera capture failed»);
// while(fb->len){
// dat=fb->buf,fb->len;
//Serial.print(fb->buf,fb->len);
//}
return;
}
/*
* Free buffer cam
*/
esp_camera_fb_return(fb);
}
void ATInternet(){
int poz=0;
int dopocet=1024;
camera_fb_t * fb = NULL;
// Take Picture with Camera
fb = esp_camera_fb_get();
String mesage=»»;
delay(10000);
Serial.print(«AT+SAPBR=3,1,\»Contype\»,\»GPRS\»\r»);
Serial.flush();
delay(1000);
while(Serial.available()){
mesage=mesage+Serial.read();
}
Serial.print(«AT+SAPBR=3,1,\»APN\»,\»internet\»\r»);
Serial.flush();
delay(1000);
while(Serial.available()){
mesage=mesage+Serial.read();
}
Serial.print(«AT+SAPBR=1,1\r»);
Serial.flush();
delay(1000);
while(Serial.available()){
mesage=mesage+Serial.read();
}
Serial.print(«AT+SAPBR=2,1\r»);
Serial.flush();
delay(1000);
while(Serial.available()){
mesage=mesage+Serial.read();
}
Serial.print(«AT+FTPCID=1\r»);
Serial.flush();
delay(1000);
while(Serial.available()){
mesage=mesage+Serial.read();
}
Serial.print(«AT+FTPTYPE=I\r»);
Serial.flush();
delay(1000);
while(Serial.available()){
mesage=mesage+Serial.read();
}
Serial.print(«AT+FTPSERV=\**********»\r»);
Serial.flush();
delay(1000);
while(Serial.available()){
mesage=mesage+Serial.read();
}
Serial.print(«AT+FTPUN=\»********»\r»);
Serial.flush();
delay(1000);
while(Serial.available()){
mesage=mesage+Serial.read();
}
Serial.print(«AT+FTPPW=\»**********\»\r»);
Serial.flush();
delay(1000);
while(Serial.available()){
mesage=mesage+Serial.read();
}
Serial.print(«AT+FTPPUTPATH=\»/*********************/\»\r»);
Serial.flush();
delay(1000);
while(Serial.available()){
mesage=mesage+Serial.read();
}
Serial.print(«AT+FTPPUTNAME=\»picture.jpg\»\r»);
Serial.flush();
delay(1000);
while(Serial.available()){
mesage=mesage+Serial.read();
}
Serial.print(«AT+FTPPUT=1\r»);
Serial.flush();
delay(3000);
while(Serial.available()){
mesage=mesage+Serial.read();
}
int c=(fb->len)/1024;
for(int l=0;l<=c;l++){
Serial.print("AT+FTPPUT=2,1024\r");
Serial.flush();
delay(3000);
while(Serial.available()){
mesage=mesage+Serial.read();
}
for(int i=0;ibuf[poz],HEX);
poz++;
// put your setup code here, to run once:
delay(3000);
}
int z=(fb->len)%1024;
Serial.print(«AT+FTPPUT=2,»);
Serial.print(z);
Serial.print(«\r»);
Serial.flush();
for(int i=0;ibuf[poz],HEX);
poz++;
}
Serial.print(«AT+FTPPUT=2,0\r»);
Serial.flush();
esp_camera_fb_return(fb);
Serial.print(«AT+SAPBR=0,1\r»);
Serial.flush();
}
Me alegro.
No tengo experiencia con el modulo SIM800, pero quizás el problema sean los delay(1000) en el envió de los mensajes, quizás sea mucho tiempo, y genere un timeout. Saludos!
Lo arme y se me conectan varios usuarios al FTP es posible que te estén espiando o copiando el contenido de mi carpeta. Tengan cuidado.
Funciona de maravilla !!!!!
Hice algunos cambios que dejo como sugerencia:
Para poder diferenciar las fotos de varios ESP uso el macaddress para añadir al nombre de la foto
ID = WiFi.macAddress();
ID.replace(«:», «»);
Serial.print(«ID: «);
Serial.println(ID);
Ademas cambié la fecha por «timstamp»
Entonces el nombre de la foto quedo asi:
String nombreArchivo = ID+»_»+timeClient.getEpochTime()+».jpg»;
Puse la actualización de la hora para asi que se conecta al servidor FTP, asi la hora quedó mas exacta
http://ftp.OpenConnection();
http://ftp.ChangeWorkDir(ftp_path);
http://ftp.InitFile(«Type I»);
timeClient.update(); <<<<buf, fb->len );
http://ftp.CloseFile();
http://ftp.CloseConnection(); <<<<<
Cuando se conecta al WIFI recojo la información de la potecia del señal – si el señal está flaco no funciona bien, falla la conexión
Serial.print("sinal WIFI: ");
Serial.println(WiFi.RSSI());
Y enciendo el LED rojo para saber que está conectado
digitalWrite(33, LOW);
Cuando saco la foto enciendo el LED del FLASH
camera_fb_t * fb = NULL;
digitalWrite(4, HIGH); <<<<<
delay(200); <<<<<
Y lo apago antes de subir por FTP
digitalWrite(4, LOW); <<<<<
http://ftp.OpenConnection();
Gracias por el aporte!
Hola a todos.
estor intentando hacerlo mediante el Sim800l y no logro hacerlo funcionar.
estoy usando el codigo subido por VISK.
¿Alguien tiene e lcodigo probado para subir fotos mediante som800l ?
Can I insert the code to wait for PIR Motion Sensor trigger from a GPIO 13 ?
void loop() {
  timeClient.update();
  takePhoto();
  delay(60000);
}
Please advise?
Si, depende del sensor PIR que utilices, pero deberías trabajarlo como un push button, si esta activo tomar la foto y volver a esperar; utilizaría algún mecanismo de espera, para que no se dispare todo el tiempo.
Ok. noted on the logic of the PIR Sensor Movement code. I will try to incorporate guide from Rui Santos into your existing program. Thanks a million.
https://randomnerdtutorials.com/esp32-pir-motion-sensor-interrupts-timers/
This is the device I am suing to trigger the photo capture via GPIO13.
Low Cost PIR Sensor Module (HC-SR501) https://my.cytron.io/c-sensor/c-optical-infrared-sensor/p-low-cost-pir-sensor-module-hc-sr501
I will like to incorporate a web cam server too for live video viewing together with your code. To make it all rounder features.
https://randomnerdtutorials.com/esp32-cam-video-streaming-web-server-camera-home-assistant/
Kindly take note your program has bugs at this sections…
char* ftp_server = «SERVER»;
char* ftp_user = «USER»;
char* ftp_pass = «PASSWORD»;
char* ftp_path = «/USER/;
I fixed it this way …
char ftp_server[] = «SERVER»;
char ftp_user[] = «USER»;
char ftp_pass[] = «PASSWORD»;
char ftp_path[] = «/USER/;
Now no errors in compiling!
Finally rewrite and compiled my custom C++ source code for ESP32-CAM photo capture via PIR motion sensor and auto upload to local FTP server on Raspberry Pi for storage… building my home CCTV system from IoT devices.
https://m.facebook.com/story.php?story_fbid=10159458924277663&id=554017662
Here is my open source code to be share and improvised by the open source community 😉
https://disk.yandex.com/d/vLR_bATubeBDXg
Excelente!
Thank you sir 🙂
Problem statement?
Current code situation …
String PhotoArchive = timeClient.getFormattedTime()+».jpg»;
// HH:MM:SS.jpg
Current file output …
Serial.println(«File Name: «+PhotoArchive);
// File Name: 12:10:21.jpg
Required file output «121021.jpg», How do we format it to this
string value for ftp acceptable format for file upload?
Utiliza getFullFormattedTimeForFile() que ya viene formateado para poder guardar en un archivo.
I got this error during compiling the source code…
error: ‘class NTPClient’ has no member named ‘getFullFormattedTimeForFile’; did you mean ‘getFormattedTime’?
String PhotoArchive = timeClient.getFullFormattedTimeForFile()+».jpg»;
^~~~~~~~~~~~~~~~~~~~~~~~~~~
getFormattedTime
Using library WiFi at version 2.0.0
Using library esp32_ftpclient at version 0.1.4
Using library NTPClient at version 3.2.1
exit status 1
‘class NTPClient’ has no member named ‘getFullFormattedTimeForFile’; did you mean ‘getFormattedTime’?
Which older NTP Client library has the «getFullFormattedTimeForFile» function? Seems the latest NTP Client Library has removed that function …
No lo tenia, yo lo agregue a la librería; podes descargar el archivo desde el blog: http://www.gsampallo.com//wp-content/uploads/2020/04/NTPClient.zip
Ok! Seems like the original author for the NTPClient have removed the function «getFullFormattedTimeForFile»
https://github.com/arduino-libraries/NTPClient
Yes… I had to replace the NTPClient with your custom NTPClient Library to use the function «timeClient.getFullFormattedTimeForFile()» and now it works!
File Name: 20220701_204656.jpg
Thanks a lot buddy for your custom NTP Client@ http://www.gsampallo.com/wp-content/uploads/2020/04/NTPClient.zip 😉
Output results is great … it works! File Name: 20220701_211217.jpg Thanks 😉
ets Jun 8 2016 00:22:57
rst:0x1 (POWERON_RESET),boot:0x13 (SPI_FAST_FLASH_BOOT)
configsip: 0, SPIWP:0xee
clk_drv:0x00,q_drv:0x00,d_drv:0x00,cs0_drv:0x00,hd_drv:0x00,wp_drv:0x00
mode:DIO, clock div:1
load:0x3fff0030,len:1344
load:0x40078000,len:13516
load:0x40080400,len:3604
entry 0x400805f0
Connecting to WiFi …
WiFi connected
IP address: 192.168.88.105
Signal WIFI: -55
Get current time: 21:12:17
Get Full Formatted Time for File: 20220701_211217
Connecting to: 192.168.88.252
Command connected
Send USER
Send PASSWORD
Send SYST
Send CWD
Send TYPE
Type I
Send PASV
Data port: 12966
Data connection established
File Name: 20220701_211217.jpg
Send STOR
Writing
Close File
Going to sleep now
*** Updated: TimeDateFile format bugs fix by author William @ Guillermo Sampallo !
Here is my updated open source code to be shared and improvised by the open source community 😉
https://disk.yandex.com/d/ejWETNcBNvP9Ug
Updated my posting at FB groups and shared with the ESP32 IoT Community …
https://m.facebook.com/story.php?story_fbid=10159458924277663&id=554017662
Thank a lot William @ Guillermo Sampallo 😉
*** Correction … Camera OV2640 optimum settings, I found this settings (AEC DSP) and (BPC) gives best video and photo quality.
Here is my updated open source code to be shared and improvised by the open source community 😉
https://disk.yandex.com/d/yLqv384ol3DUsA
Credit to original author William @ Guillermo Sam